Monday, December 30, 2013

Best Christmas Present!

I got the neatest present for a stamper this year and wanted to share. My daughter got it for me and I am tickled she came up with something so thoughtful and practical and craft-related (the latter being tough as she is not into crafts).  Ta-da!

Now before you think I have lost my marbles - let me explain - I am using it to hold my heat embossing tool. Like so:


If I ever get back to soldering I can use it for my soldering tool, too. It is heavy silicone, heat resistant to 500 degrees F and it adheres to the table top without adhesive or suction cups. I wasn't sure it would adhere to my roughed up wood work table surface, but it is working just fine.

If you are interested in one, you can visit www.hotironholster.com. Mine is the "deluxe" model which is the smaller, cheaper of the two listed. It easily holds my 9-inch Marvy heat tool. If you are a boring non-crafting person, you can use this to hold hair appliances like curling irons and flat irons. But for stampers, it's da bomb!


Saturday, December 28, 2013

Life is better...

 ... on the river! Or so my friend thinks. She has a lovely get-away cabin on a beautiful piece of property on the Cowichan River in British Columbia. So I took the basic idea of the jingle bell vinyl project and morphed it into this year-round wall decor item.
The sentiment is an eCut file from the Silhouette America online store. The rocks are from Michaels (check where they sell vases) and the patterned paper in the background was also from there. I thought it looked a bit like pebbles underwater. 
I will admit my placement was slightly off on the layout of the vinyl, so I added a period to the saying to balance it out horizontally within the frame. The file does not come with punctuation - so I went low tech and used my single hole punch to add that item. It made for a nice, personal Christmas gift!

Wednesday, December 25, 2013

Sleigh Bells Ring

Merry Christmas! Here are the cards I made to go with my framed Jingle Bells for my staff this year. Fourteen tiny reindeer, plus seven more for the matching envelopes. Have I mentioned how much I enjoy using my Silhouette Cameo? The card is a Samantha Walker file from the Silhouette America online store.

I glittered the lead reindeer's nose red, which shows up better on the green versions. The cover "Sleigh Bells" saying is a Waltzingmouse Stamps design and I stamped that in Delicata Golden Glitz pigment ink for shine. The second panel is the same Kerry Bradford design that I used on the shadow boxes, and the Santa image is an Echo Park design also from the Silhouette America online store. I inked the antkers with a gold Krylon pen.


Look at the matching envelope. It was a bit of a snug fit for the card, but it did work. It is all one piece, the reindeer is the bottom flap folded up, but I added a gold reindeer piece over top as I wanted the reindeer to stand out from the background paper. To glue that flap down, I relied on my favourite adhesive for intricate die cuts.

Lay item face side UP onto the sticky adhesive sheet.
Place protective liner over top and burnish (rub) the item to adhere the sticky glue microdots to the back.

I liked the variety of the papers with the same gold reindeer on each flap. 

 
In hindsight, I think I would prefer tiny googly eyes for the reindeer instead of the cut hole, but still I marvel at how the Cameo can cut such a tiny perfect round hole! Hope you are enjoying today with friends and family. Thanks for visiting!

Friday, December 13, 2013

Peeking and Jingling

The Waltzingmouse Christmas Card Challenge for October was to create a whimsical and silly card. It took two months but inspiration finally struck! The number 25, the snowflake and the "No peeking" border are stamps from the WMS "Santa's Coming to Town" set, but the peeking girl image is a digital print and cut file from a Silhouette Facebook group. I need to re-do the border, though, as I cut that last word off at an unfortunate spot! I am adding this to the Weekly Christmas Card Challenge blog.

Hopefully my staff are not peeking here, as I am going to share what I have been making for them for Christmas:
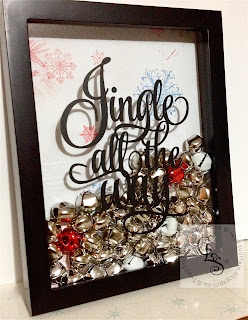
Isn't this fun? The vinyl lyrics were cut using a file from Kerri Bradford. The shadow box and bells were purchased at Michaels. I downloaded the digital artfully winter paper pack for the background and added some stamped snowflakes.  Made eight of them!


Thursday, December 5, 2013

A Belated Quietfire Thanksgiving

Hello, my poor, neglected blog readers! I hope if you are American that you had a lovely Thanksgiving. In Canada, we have our turkey in October. I sent a few autumnal cards off to my relatives and friends in the USA. For the ones I am sharing today, I used Quietfire Design stamps and cut files. This first card is made using the Burnished Velvet technique. The entire card front is covered in glitter and rubbed smooth (burnished) so it is smooth as velvet, but very glittery. The "Autumn" is a Quietfire cut file from the Silhouette store and the leaves are also from the online store. I applied wide Sookwang tape to the card front and ran it through the Silhouette Cameo to cut only the top layer of the tape's protective sheet.


Then I peeled back sections and sprinkled on the glitter to get the various colours. The top photo shows the glitter well.


This photo shows where I used a couple of different colours of glitter on the leaves. The true colour of this card lies somewhere between these two photos.

This second card is made using a Quietfire quote stamp and a companion pumpkin motif. I used Versafine Vintage Sepia ink and coloured with Copics.


On the inside of the card, I cut out the Quietfire pumpkin cut file in orange vellum and layered it over the stamped Happy Thanksgiving greeting.


I was in Phoenix just before the US Thanksgiving, and managed to get a manicure. I chose a coppery orange to keep with the season. The gal painted a flower on my ring finger. The manicure is long gone, just like Thanksgiving, but I hope you enjoyed this little catch up post!

Wednesday, November 13, 2013

Cameo Castle and Chomas Inked Envelope

I am still learning the ins and outs of my Cameo machine. This is a birthday card for a four year old girl who is very much in the fairy tale stage. The card front features Waltzingmouse Stamps coloured with Copic markers.

Card measure 4.25 X 5 inches.
Here is the pop-up inside, made with a cut file from the Silhouette Online store:
Look at that cut out greeting! I would never have the patience to do that with an Exacto knife. Because the castle doors open (the windows do, too) I wanted there to be a little surprise when Mikaela opens the doors, so I placed a butterfly gem inside:

I am entering this card in the Seize the Birthday challenge.

The really FUN aspect of this card for me was the envelope. I have abysmal penmanship from many years as a newspaper reporter when I would scribble notes in a notebook on my knee, so the addressing of a birthday card envelope has always been disappointing for me. Not any more! I used my new Chomas Creations pen holder in place of the cutting blade on my Cameo and used a Chomas pink glitter pen to address this:

Font: Arizonia
This was my first item made with the pen adapter and it was easy. I am looking forward to trying sketch files next!

Sunday, November 3, 2013

Acanthus and Poppy

I am so happy to be able to play along in the latest Waltzingmouse Fanatics Challenge - which is a colour scheme per below:

I recently purchased a couple of gorgeous Anna Griffin Cuttlebug embossing folders: Acanthus and Poppy. I used Acanthus for this card, creating a background by pouncing Ranger Perfect Medium ink overtop and chalking. I used three blues and a grey to chalk, but it all seems to blend into one!
I used Versafine Deep Lagoon ink to stamp the Victorian Fripperie border and monogrammed medallion and heat embossed in clear.
I applied Swarovski heat-set flat backed crystals to the elements. I was lazy and used Ranger Glossy Accents glue to affix them instead of getting out the hot wand. I actually have more faith in the Glossy Accents' holding power. I tried to catch the sparkle of these gunmetal blue gems but my iPhone just isn't up to the task.


The Poppy folder seemed to call for a more exuberant colour palette. 
I used various Distress Inks to colour the background for this Birthday Card, which I am entering in the Seize the Birthday challenge. You should check it out - lots of great birthday card ideas over there.
Thanks for stopping by today. I'll be back soon with more cards.


Wednesday, October 16, 2013

I {HEART} MY CAMEO!

I think technology is a beautiful thing when it can take the mundane and make it sublime. Over on the Ranger website they have a PDF of labels for the Distress Stains and Distress Paints. The labels are designed to be cut with a three quarter inch punch. I don't have one. Or they could be cut by hand with scissors. All 52! Ugh!

So I made a cut file from the PDF using my Silhouette DE software. In minutes my dots were printed and cut on my Silhouette Cameo and now I just need to glue them to my bottle caps. If I had been less excited and thinking clearer, I would have printed onto an adhesive backed label sheet to save even more time. Still, I am pretty happy with this time-saving project. 

Creative Chemistry 102 - Day 3

Distress Differently! That was the theme of Day 3 in the Online Card Class "Creative Chemistry 102." For better or worse, here are my six tags. The photo tinting is my fave - I think because of the Quietfire Design "Cherish" cut file. (Available here: http://www.silhouetteonlinestore.com/?page=view-shape&id=47957) Now it is back to the "laboratory" for me.

Smudge Stamping (background)

Brayered Stains
Photo Tinting. (That's me - age three!)
Faux Cracked Glass
Close up: Faux Cracked Glass. Collage under acrylic Fragment.
Distress Glitter Rock Candy


Distress Glittering (Black Soot mixed with Pink)


Thursday, October 10, 2013

Creative Chemistry 102 - Day 2

I have done all the techniques covered in Day 2 of CC102. I must say, I need to develop a better water flicking wrist action than what I've got going on right now! Tim Holtz makes it look so easy...

Day 2 was all about stencils, specifically Tim's Layering Stencils. I don't own any of those but I do have plenty of other stencils on hand so decided to make do. I think the first and last ones are my favourite effects - but I definitely need more practice! Can't write more - I am busy playing with the Day 3 techniques. Stay tuned. 
Mixed Media Layering

Machine Embossing With Stencils

Distress Embossing Through Stencils

Stencil Stamping
Stencil Sketching

Ink Monoprint
Paint Monoprint