Showing posts with label 3-D item. Show all posts

Sunday, April 21, 2019

Happy Easter Box & Coaster

Happy Easter! I made this box (about 5 inches square) from a Dreaming Tree cut file. It went together easily.
The four flaps on this flat top box open to reveal a marble tile coaster I stamped and sponged with Ranger Distress Archival Inks. I had some black shredded paper from Sephora that I saved and it was perfect as cushioning.


I added a tag with a vinyl sentiment cut from a Suzanne Cannon calligraphy file from the Silhouette Design Store.
Thanks for stopping by today. I hope your Easter was enjoyable.


Saturday, December 30, 2017

Welcome, 2018!

Happy New Year! I hope this year brings health and peace and wisdom to you.

I had a haircut today to start the new year right, and I made the above goofy eyeglasses for my hairdresser as a gift for her 8 year old daughter. You can find the free SVG file at the Simply Crafty SVG site.

I also made her this card, which has lots of glittering sparkly fireworks (heat embossed glitter embossing powders) in real life.


Thanks for visiting today!

Thursday, December 21, 2017

Free Gift Card Holder File

I did not have time to make greeting cards for my staff this year, but I wanted to present them with gift cards in a novel way. Dreaming Tree has a free file to create a clever pop up gift card presentation. I made an assortment.


In the upper left is the prototype but I was rushed for time so fussing about with ribbon was a challenge. I discovered I could affix these pins, that I picked up at Winners, to close the pouches and skipped the ribbon on the rest.

I forgot to take a photo of the inside which is elegant and clever, so pop over to the Dreaming Tree site to see that and if you have an electronic cutting machine, be sure to snag this freebie!

And here is a card I made this year that made me smile. It is very simple, for my great niece who is only 18 months old. The penguins are mounted on Action Wobbles so they shimmy and make me laugh. I hope they make her laugh, too!


Wednesday, December 20, 2017

Dreaming Tree Christmas Card


I have not been feeling well this season so the Christmas Card production came to a bit of a halt and I feel bad some folks won't be getting a card this year.

However, I did find time to make one very special card to put in my parcel to my Mom. This is a Paperscape Box Card SVG file from Dreaming Tree that folds flat for mailing, but also works as a luminary with LED lights inserted in the base. Dreaming Tree files are a dream to work with, very well designed, and Leo provides video instructions on the website that are very clear to follow.

Here is a bit of a side view. There are four layers including the background.

A Quietfire Design stamp in Brilliance ink provided the greeting. I added crystals later.

These were supposed to be cardinals but I wanted a blue and white card, so Mom gets blue jays instead.


Finished card with gemstones.

Here is the card with the LED lights inserted, next to my Mom's Christmas tree. She is enjoying it.


Saturday, June 11, 2016

Paper Chandelier

"Mom, can you make something like this?"

"Sure."

30 minutes of internet research and I had a plan. Couple hours later, I had this:


I found a free PDF template for the chandelier here:
http://www.instructables.com/id/Dimensional-Silhouette-Chandelier/

I used 110 pound Black Recollections cardstock from Michael's. Gotta love my Silhouette Cameo!
SaveSave

Saturday, December 28, 2013

Life is better...

 ... on the river! Or so my friend thinks. She has a lovely get-away cabin on a beautiful piece of property on the Cowichan River in British Columbia. So I took the basic idea of the jingle bell vinyl project and morphed it into this year-round wall decor item.
The sentiment is an eCut file from the Silhouette America online store. The rocks are from Michaels (check where they sell vases) and the patterned paper in the background was also from there. I thought it looked a bit like pebbles underwater. 
I will admit my placement was slightly off on the layout of the vinyl, so I added a period to the saying to balance it out horizontally within the frame. The file does not come with punctuation - so I went low tech and used my single hole punch to add that item. It made for a nice, personal Christmas gift!

Friday, December 13, 2013

Peeking and Jingling

The Waltzingmouse Christmas Card Challenge for October was to create a whimsical and silly card. It took two months but inspiration finally struck! The number 25, the snowflake and the "No peeking" border are stamps from the WMS "Santa's Coming to Town" set, but the peeking girl image is a digital print and cut file from a Silhouette Facebook group. I need to re-do the border, though, as I cut that last word off at an unfortunate spot! I am adding this to the Weekly Christmas Card Challenge blog.

Hopefully my staff are not peeking here, as I am going to share what I have been making for them for Christmas:
Isn't this fun? The vinyl lyrics were cut using a file from Kerri Bradford. The shadow box and bells were purchased at Michaels. I downloaded the digital artfully winter paper pack for the background and added some stamped snowflakes.  Made eight of them!


Sunday, September 29, 2013

ATTN: Silhouette Cameo and Portrait Owners

If you own one of these machines, you will want to read the notice on the Silhouette America support web page and check your power adapter to ensure it is not displaying a counterfeit "UL" symbol. You can read about it here: http://www.silhouetteamerica.com/media/docs/public-notice-20130917.pdf

Now that I have passed on that bit of news, please enjoy this little project:


These are Martha Stewart wedding favour boxes that I dressed up with some Quietfire Design stamps. Thanks for visiting today!

Sunday, May 19, 2013

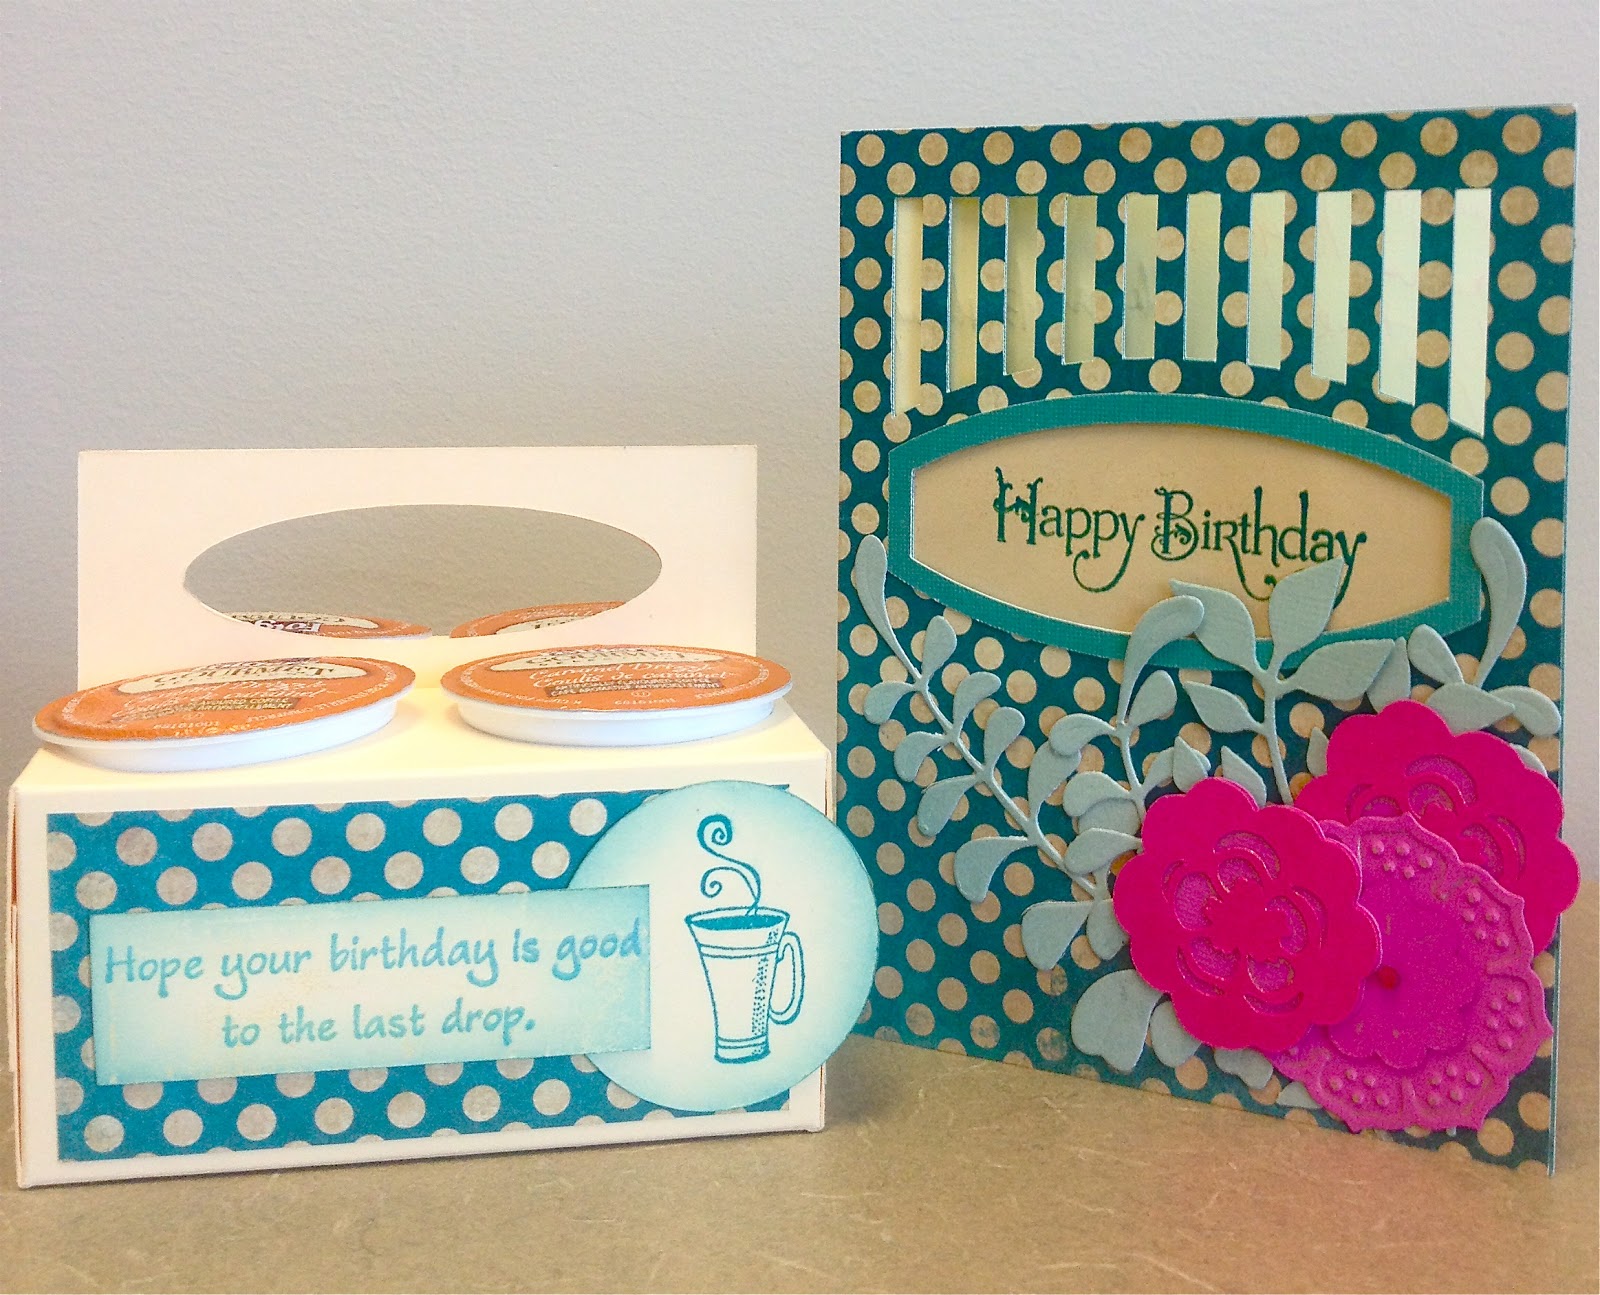
K-Cup Caddy and Card


I am having fun with my new Silhouette Cameo machine. I used it to make a Keurig Coffee Cup Caddy to match a birthday card.

This little caddy holds four K-cups in 1.75 inch circles. I found the free PDF design online, but wanted to cut it with my Cameo so I needed to re-create it from scratch in the Silhouette Designer Edition software. It was very easy. This is my first attempt. The next one will be more decorative, but I was working on a deadline for an office gal's birthday the next morning.

It's a fun way to present a few special flavoured coffees.


The card was made using a design from the Silhouette Online store for the base and the flowers. The leaves were die cut the old fashioned way, with my Cuttlebug. The greeting is a clear stamp from Crafty Secrets, the only stamping on this card!


Thursday, September 20, 2012

Stationery Box

One of the notelets with matching envelope.
I made a Stationery Box for my Mom for her birthday. I followed the excellent instructions found at Splitcoaststampers.
Here is the box with the monogrammed lid on. The 2 inch tall "m" is a die cut from the Blossom Quickutz alphabet. The lid holds the side walls up. I made it out of very sturdy scrapbook paper. It is the thickest I have seen and I bought it at my local stamp store. I also made a butterfly birthday card (more about that in a separate post).

Box opened.
There is space for a notebook (I customized / re-purposed one I had lying about) and a pocket for stamps.  The tutorial places the pocket upside down, but the way I have it, when the box is closed, the stamps stay put. Our Canadian stamps take up too much room, so there wasn't space for a pen, as well. I figure my Mom has plenty of pens, though.
Tags and notelets. Most stamps used are from Waltzingmouse Stamps.
Inside the box I managed to put five tags, three notelet cards with matching envelopes (made with a BigZ die), and five regular A2 sized cards with matching envelopes.
Five cards for a variety of occasions.
So Sweet of You (Stampin' Up!) with a Cuttlebug embossed border. 

Cuttlebug embossing folder. The sentiment was diecut out of cardstock that I covered front and back with double-stick tape.  I coated it in Martha Stewart glitter.

The Stamp Camp USA tea set goes well with the doily and the Waltzingmouse Stamps sentiment.

The Our Daily Bread verse is framed by a Spellbinders label and I cut apart two die cuts of the Spellbinders Decorative Frame to create a bit of interest on the outer border.

A very CAS card incorporating the same scrapbook paper and stamps and punch from Stampin' Up!
The tutorial and the accompanying video are well done and I am glad I tackled what looked like a daunting project. It went together quite quickly. There is a Stationery Box gallery on Splitcoaststampers showing a variety of these types of boxes. I encourage you to try it if you have not yet!

Tuesday, February 28, 2012

Dollar Decor & Ribbon Trick

What can you get for a buck these days? Or what could you make for a buck these days?
Quite awhile ago I was at the Great Canadian Dollar Store and came across some Making Memories hanging photo frame kits. They were one dollar each.

Each kit contained three cream metal embossed frames and a length of pink ribbon. The ribbon alone was a steal at this price! I took them home and stored them for a year or two, and finally got inspired. I needed something new for a wall in my loo.


I started by pouncing Ranger Alcohol Inks (Stream, Lettuce and Denim) over the metal.

I lightly sanded the high points of the embossing to expose the shiny aluminum surface.
I stamped and heat-embossed some nautical images (Crafty Secrets) in brown onto some aqua cardstock to mount in the apertures. I had some Martha Stewart printed ribbon in pale aqua/brown floral print that seemed to coordinate. (More on the ribbon bows in a sec.) Here is the completed wall hanging.

Perhaps the BEST part of this project (which was completed in less than half an hour!) was the clever way the ribbon bows are formed. The photos on the back of the box explain it better than I could (below) and I can see using this method again on cards and boxes and such.


Hope this inspires you to consider upcycling a bargain!