Showing posts with label Dreamweavers. Show all posts

Monday, August 7, 2017

Copper Christmas for August

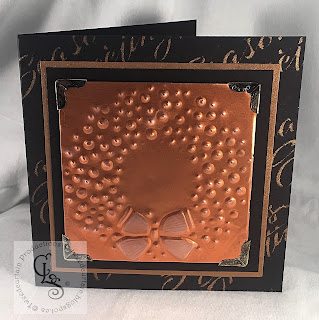
Here is my Christmas card for the August challenge at Sylvia Durocher's blog. This month the inspiration prompts are copper and square. I have a roll of 36 gauge copper metal sheet, so I decided to get literal. This is a 5 inch square card.


I used a Dreamweaver's Stencil to emboss the wreath in my Cuttlebug, then used ball and cup metalworking tools to further enhance the relief. I sanded across the top to get a bit of contrast on the berries and bow.

The stencil includes a script Season's Greetings saying and I sponged Celestial Copper Delicata ink through the stencil to create a bit of a background, which I promptly covered up with layers of matting. The copper square mat is actually tan cardstock that I coated with the same Copper Delicata stamp pad to coordinate. The ink is rich and radiant - just like its label says! I had some brass corners to cover the sharp corners of the metal square and I antiqued them with Black StazOn ink. Thanks for visiting!

Monday, April 21, 2014

Dreamweaver Stencil Flowers

Isn't this a lovely thought? It is a Quietfire Design rubber stamp. I stamped it in Martha Stewart Aloe pigment ink, a rich green colour that I felt went well with the cardstocks I used to mat the card. And I hoped the green complimented the flowers that are the focal point.

To make this card I stencilled pearlescent embossing paste through a Dreamweaver Stencil LX7021 (about 6.25 X 4.5 inches). I dusted it with some silver mica powder while it was still wet. Once it was dry, I trimmed it down a tad and went around all of the petals with various Copic markers to highlight and provide colour.
This was a nice technique because the colours are vibrant and happy, but the silver paste petals tone down the effect and are less "in your face."

I am entering this on the Dreamweaver blog (inspired by spring!) and on Seize the Birthday, too. Keep dreaming!

Sunday, September 8, 2013

Dreamweaver Stencil Autumnal Card


Today I am doing a little happy dance. I randomly won the Dreamweavers Dream it Up! blog challenge for "Christmas in August" simply by entering an ornament I had made using one of their fabby stencils. Each month they have these challenges and I am hoping to do more of them as I am just learning about using stencils. The challenges motivate me. I encourage you to play along. You do not need a blog to play - you can email a photo to Lynell and she will include it in the running. The winners are drawn randomly so even newbies like me have a chance to win stencils! Of course the hard part is deciding which one I want!

This month the challenge is "Awesome Autumn" and I have a card to share using this Dreamweavers Bare Trees Stencil LJ 849 that I won in another Dreamweavers blog contest:


The trees are the metal part - picture silver metal trees against black paper. The black shows through the openings in the stencil. Here's my card:
Card measures 4.25 X 5.5 inches. The sentiment is a
Waltzingmouse stamp on a Spellbinders Labels 14 die cut.

You might be wondering how I got the trees black when I used white cardstock for my base. I coated the entire stencil with black pigment ink, then ran it through my Cuttlebug machine to ink and embed the tree silhouettes into the white cardstock. After removing the stencil, I quickly sprinkled clear embossing powder on the ink and heat embossed the trees and border. The trees were now shiny. Then I used strips of low tack tape masks to section out "rays" in the background to sponge on Distress Inks. The embossed trees resisted the inks. I used the same inks to colour the die cut label while the cardstock was still in the die, leaving the white border. I mounted it on a barely visible bright lime green card front - which you might question, but looks smashing in real life! 

Check out the Dreamweavers Blog (right now they are showing fun techniques with glitter) and enter the Awesome Autumn challenge. You, too, could be a winner!

Monday, August 19, 2013

Dreamweavers Stencil Ornament


The Dream It Up Blog is having a Christmas in August challenge. This is a flat porcelain ornament. I covered it in alcohol inks using the Polished Stone technique. Then I taped the antler snowflake Dreamweavers stencil in place and sponged liquid adhesive on the surface. I let it sit for 30 minutes to get tacky, then applied silver leaf. Finished the edge with a silver paint pen and tied on some metallic ribbon floss. It was difficult to capture a good photo that shows the shine of the leaf and the glow of the inks!


Friday, April 19, 2013

Today's Quietfire Creations Guest Designer

... is me! In my second posting to the Quietfire Creations blog this month as guest designer, I present some really simple, quick, yet elegant cards. I hope you click on the blog link above and visit. While you are here, I will share a couple of other cards using Quietfire stamps. This first one features possibly the very first stamp I purchased from Quietfire Design way back when.

Distress Ink background, Tim Holtz Postcard Texture Fades Embossing Fold
Next up, I created an alcohol ink background for this card and silver embossed "thank you" on the top half. The bottom half features a Lace Border Dreamweavers Stencil and the Burnished Velvet technique.
And lastly, here is a card created very simply with  a wash of Springtime Twinkling H2O's on watercolor paper, then the Thoreau quote stamped with Versafine Deep Lagoon and clear embossed.
Spellbinders Labels 18, silver mirror cardstock, navy Canson Mo-Teintes

Thanks for visiting today - please go check out the Quietfire Creations blog to see more!


Sunday, November 4, 2012

Distress EP, Dreamweavers and WMS Sketch

For this Christmas card, I tried a new technique using a Dreamweavers snowflake stencil, some regular stencil embossing paste, and Rangers Tim Holtz Distress Embossing Powder in Tattered Rose.

I used this week's Waltzingmouse Sketch Challenge for the design, but opted to put the borders top and bottom instead of on the sides. Here is the sketch:

And here is my "distressed" card:
My first step was to take a plain white piece of lightweight cardstock and tape the stencil in place in the middle. Then I spread the paste over the stencil and scraped off the excess. I lifted up the stencil, then applied the Tattered Rose Distress Embossing Powder. I let it dry, then heat embossed the powder to assure good adhesion. The texture is very unique - sort of sand-roughened.

I used my foam sponge blending tool and applied various Distress Inks to the cardstock: Antique Linen in the center and Salty Ocean and Broken China moving outward. A moistened swab was used to remove any ink from the snowflake. I cut the ornament shape (Spellbinders Heirloom Ornaments 2011) from the center and inserted a pearl brad, then traced around the die on a scrap of cardstock and cut out a shadow layer. I treated it with the same Distress EP on the edges and layered the snowflake piece on top.

The inked up cardstock with the ornament hole in the center was too pretty to discard, so I ran it through my die cutting/embossing machine with the Sizzix Tim Holtz Postcards embossing folder. I highlighted the raised lettering with Tattered Rose and Antique Linen Distress Inks. With the shadow layer under my snowflake, I could use pop dots to adhere it back on the background with no cuts showing.


I have a few precious pieces of cobalt blue Italian silk cardstock and used one to border the ensemble. Before layering, I die cut a very large piece out of the center so that it is mostly just the visible border that was used. No sense wasting that goodness underneath!


I embossed the Waltzingmouse vintage greeting, and border strips in a pearly embossing powder that echoes my thin border. I added a "Mini Me" Waltzingmouse ornament just for fun. The card base is cream but I treated it all with Tattered Rose Distress Ink to tie it all together. Ranger and Dreamweaver are showcasing techniques using the Distress Embossing Powders and the stencils, and there are prizes! Check out these links for more information: Dream it Up Blog and the Ranger blog. And while you are at it, create a card for the Waltzingmouse Sketch Challenge. You don't even need to use WMS stamps to play along!

Doin' a Happy Dance!


Hello! I just found out that the good folks over at the Dreamweavers Blog chose my Burnished Velvet Leaves card for their October "Festively Fall" challenge winner in the category: Best Interpretation of the Challenge. Woohoo! I get to choose a stencil from the vast array of Dreamweaver Stencils. I have already decided on this one:

You can see an amazing card by Joy Hauck here on the Dreamweaver Blog that shows what can be done with this stencil. Another great sample using glitter (with instructions!) can be found on Yogi's amazing art blog here. Thank you, Dreamweavers, for choosing my card!

The November challenge on the Dreamweavers Blog is CAS Holidays (Clean and Simple). The only two Dreamweavers Stencils I own are holiday related, a snowflake and a spray of holly. I decided to enter this challenge using the holly. I rarely make anything CAS so this is extra challenging for me!


I bought the stencil, some embossing pastes and a metal offset spatula at my local stamp store (Stampers! in Victoria, BC) eons ago, but I have never gotten around to trying them out until now. Shame on me!

I taped the stencil down, ran it through my Cuttlebug to pressure emboss, then used Copic markers to colour in the image. I needed to use a light touch with the markers so they didn't seep under the stencil. Then I applied the transluscent Pearlescent Embossing Paste over top, removed and washed the stencil, then waited for the holly to dry.

Meanwhile, I created a little label with a Stampin' Up! punch and found it paired well with a Spellbinders Labels 21 die for a glittery background. I stamped the sentiment with Versafine Olympia Green. It's a Waltzingmouse Stamp. (One of the monthly WMS Christmas Card Challenges is to make a card based on a song. Fa la la la la...)  Two strips of glittered tape top and bottom framed the holly nicely and the whole works was mounted onto dark green card stock. This is a 5.5 X 4.25 inch card.

I hope you can see the raised image in the photos. The paste dried in about 20 minutes and I think it looks better in real life than it does in the photos. It is pearly, but not as muted as the colours here suggest. I can't wait to practice more and improve my technique! Why not join the November CAS challenge on the Dreamweavers blog, too? See you there!