Showing posts with label CAS. Show all posts

Sunday, February 24, 2019

Freshly Made Sketches 376


I made a card for the Freshly Made Sketches blog challenge. Here's the sketch:

And here's my card:


The paper was a failed attempt at the Layered Batik Resist technique described in a Splitcoast tutorial here. While the front of the paper was a mess, I really liked the back of the paper after ironing, so decided to stamp a few blue blooms on that and use it for my feature panel.

Here's a close-up of the hot-fix Swarovski crystals and the Avery Elle celebrate die. I have gotten a lot of use out of that set of word dies.


This card also works for the CAS challenge at Splitcoast to use Thirds.

Sunday, December 9, 2018

Happy Hanukkah


Here it is once again; well, actually, this year Hanukkah began on December 2. Even though I put a reminder in my calendar, I still did not get this card finished by then. Luckily for me, there are eight days to celebrate the Festival of Lights!


I cut out the greeting (kerribradford.com) and free-hand designed the candles. The Star of David was a free SVG file courtesy of the internet. I coloured the flames with Copic markers. The blue is a beautiful silk-finish cardstock. I cut everything out of the yellow and the blue, then popped the bits back into the yellow base, so it's all level and clever looking. :-)

I am in the throes of Christmas card making, so it was a challenge to stop and pivot a bit here, but I'm happy with the way this turned out.

Friday, July 6, 2018

Seize the Sequins!


What's a birthday without confetti?

Over at the Seize the Birthday blog the "toppings" optional challenge is sequins. I have a clean and simple card (no stamping involved - eek!) and it features sequins. Take a look:

I used a My Favorite Things Stitched Basic Edges die to create space for an inset of Prima Fairy Flora paper. Same paper was used for the inlaid Avery Elle "celebrate" die cut. The WMS "Peaches and Dream" sequins took their colour cue from the paper.

Thanks for visiting today!

Sunday, June 3, 2018

Freshly Made Sketches #339 X 21!


The Freshly Made Sketch was truly a challenge for me, geometrically speaking. My brain had difficulty getting these triangles just right, as you will soon see:
But I persevered and I made more cards in one day than I have ever made in my life; 21, to be exact! Of course, my favourite ended up being the very last one I made. Go figure.

They are all thank you cards (I currently need a lot), 4.25 X 5.5 inches and mostly different - I was just trying to use up scraps of patterned paper. Some are heat embossed, others are not. Some are more clean and simple and others got fussy. Here they are:

Washi tape strips. Verve stamp. Kaiser Craft paper.
These next cards have a masculine feel so I am entering one of them in the almost-ended Simon Says Stamp Monday challenge.
Waltzingmouse stamps. Memory Box dots and really old Basic Grey designer paper
I have been hoarding saving.


I thought this Waltzingmouse stamp was perfect! 
Memory Box papers, Avery Elle die cut "thanks." 
Stickers my sister gave me and I finally used. 

Lawn Fawn die cut pierced edge.
Washi tape sentiment. Easy peasy! 

The flowers on this paper dictated this flipped layout.
Waltzingmouse stamp, left, and Verve stamp, right. 
Different card bases; this Prima designer paper had so many colours to choose from.
Some glitter washi tape and a Quietfire Design die cut inlaid in card front. I had a mishap
with some StazOn ink so had to add a bit of shading around the top.
SaveSave

Saturday, September 23, 2017

CASology: BIG


Hi, there. Today I am playing in the CASology blog challenge, which is the prompt BIG. This A2 sized Clean And Simple welcome card for a new staff member fits the bill.


I made the hello sentiment on my Silhouette Cameo and popped it up with foam tape over a piece of homemade decorative paper that I have been hoarding for years. It has beautiful oranges and teals and is made by rubbing oil pastels into textured cardstock and burnishing until it is smooth and looks like an old oil painting. I felt bad to have covered most of it up - but it does shine through the sentiment. I also added a strip of copper foil washi tape. I am a VERY late adopter of this embellishment but it is growing on me.

Here's a close up of the sentiment background..


Monday, August 7, 2017

Parachuting Panda

How is your day going? Today is BC Day, so a statutory holiday for me. Yay! And I found time to make a birthday card using the My Favorite Things Happy Pandas stamp set.

This is a Clean And Simple (CAS) card that was inspired by the Splitcoastampers CAS challenge "Head in the Clouds." I started with a pale blue cardstock and created the clouds by sponging Distress Inks over the edge of Memory Box cloud die cuts. The banners and balloons are part of the set and I thought it might look like he is parachuting if I set him on the cloud background. I coloured things in with Copic Markers.
I will enter this happy little fellow over at Seize the Birthday Challenge Blog, as well. The challenge is to Tie One On and I made sure Panda's parachute is securely fastened!


Saturday, April 22, 2017

Burnished Velvet Thank You Cards


I think my favourite thing to do with my Silhouette Cameo is to make "die cuts" in cardstock and back them with tape, then burnish micro fine glitter into the tape. This fills the holes with glittery goodness that is soft as velvet and does not rub off.

This glitter technique is called Burnished Velvet and in real life these cards have a lot of wow factor. For the first one, the tulips, I backed the cardstock flower with white cardstock covered in double-sided tape and rubbed in iridescent glitter to create a glittery background. I wish this showed up better in the photo. (All photos expand if you click on them.)


Stamp: Stamp-it Australia

The tulip design was a cut file from the Silhouette store, as is the peony below. Here is what it looked like in the store:
Here is what I made with it:
Stamp: Waltzingmouse Stamps

I tried to do a little shading with a few pink shades of glitter. I need to practice that more. Basically I masked off sections of the flower (I used the Cameo to cut the mask from the tape liner) and sprinkled on the darkest hue in the centre, rubbed it in, then added the lighter sections. 


I used a milkshake straw cut on a diagonal as a scoop to pick up the glitter and place it (mostly) where I want it. The technique is magical because the glitter looks a bit dusty until you burnish it with your finger. Then it comes to life and really sparkles.


It is Administrative Professionals Day on Wednesday so these two cards are going to the people in my office who really deserve much appreciation for all they do for all of us!

You can see more Burnished Velvet cards by clicking on that label on the right hand side of this blog. You can find out how to do the technique here: Be Creative tutorials.

Friday, January 20, 2017

Sympathy Card in Gold

The CFC165 CAS-ual Fridays challenge is "Everything Turns To Gold". This is a large (5.5 X 8.5) card that I made for a group condolence card.


I put a number of folded pages inside to allow for a lot of notes and signatures, and enclosed them with a pamphlet stitch.

I embossed the flowers with gold embossing powder. The flowers and butterfly are from Altenew, and the sentiment is from Verve Stamps.
I stamped a matching envelope in Delicata Gold ink. Thanks for visiting!


Sunday, November 6, 2016

Gold Star Christmas

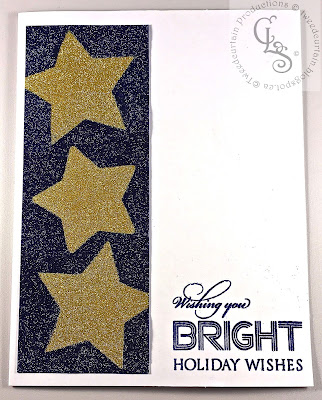
I am slowly working my way through Sylvia Durocher's monthly Christmas card prompts. I am not doing them in order, so today I will share the prompt from January 2016 - which was to use the colour gold and a 5 or 6 pointed star. I use the Burnished Velvet technique to create my three stars. I used the 52 Christmas Card Throwdown challenge November Sketch for my format.


Using two colours of microfine glitter and wide double sided tape, I created the panel of gold stars against a navy sky. The navy is not so speckled in real life but the camera was picking up the reflection from the glitter. The sentiment is from Penny Black's Festive Cheer set. I am entering this in the Penny Black and More Anything Christmas challenge.


Friday, October 28, 2016

A Basket of Pumpkins

Here's a CAS card for the Card Concept Challenge #60 (Chevron Pumpkin). I got the fall vibe and the pumpkin part. 


Stamped with Memento ink and coloured with Copics. The pre-fab card is by Memory Box - quite a sunny yellow. I love their coloured cards because they are white on the inside - no need for a liner. Thanks for stopping in!