Showing posts with label glitter. Show all posts

Sunday, September 24, 2017

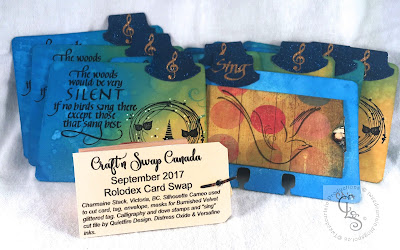
Rolodex Card Swap: Birds of a Feather

I recently joined a Facebook group (Craft'n Swap Canada) that is for Canadian crafters who want to swap items without dealing with US postage. It sprang out of a Canadian electronic cutting machine group, but the use of a machine is not mandatory for the swaps. 


Quote and wreath were staped in Versafine Onyx Black and clear embossed. White gel pen was used to add some dots here and there.
Years ago I used to do swaps all the time to try out and learn new techniques. As postage got more expensive and time got more limited, I had to forego that. One of the old swaps I participated in was for Rolodex cards and I still enoy seeing those cards in my office Rolodex when I am flipping through the mundane contact info. So when this new FB group decided to do a Rolodex card swap, I jumped at the chance to increase the creative content of my office files. The theme for this swap was Birds of a Feather but there was lots of latitude in how one approached it. I chose to do some Distress Oxide backgrounds, some stamping, a Burnished Velvet tab, a distressed pocket and smaller tags for signature.

Front and back.

Calligraphy stamp, dove stamp  and "sing" Silhouette Studio cut file: Quietfire Design. The hatted bird in the wreath was a free stamp by R Maria Sabina from UK Craft Stamper magazine.

I used my Silhouette Cameo machine to cut out the cards, the pocket on the back, the large info tag inside the pocket and the wording and bird on the tag. I also used my machine to cut out the masks for the tab "sing" and musical note. These are the Memory Dex style of card measuring 3 3/4 inches x 4 inches. The ones I will receive are a bit shorter to fit a standard Rolodex file. It was really nice of the swappers to accommodate my special request for the smaller size.

Welded wording idea is from Kerri Bradford Studio, but I used my own font to recreate so it would fit the space better. Bird is KBS, though.
I love to create masks for the Burnished Velvet glitter technique and I am amazed at what a great job my Cameo does on this. The word "sing" below is barely an inch wide! It is a cut file designed by Suzanne Cannon, a calligrapher. The cut file comes with a bird and plant that I did not use. I cut the tape liner with my machine while it was still stuck to the double-sided Sookwang tape that was affixed to a piece of cardstock that was laid out on the Silhouette mat. I covered the tab (punched with a Stampin' Up! punch) with the same type of tape and laid the thin calligraphy liner on top. Then I rubbed navy microfine glitter into the exposed tape. Once the excess was brushed away, I removed the word tape liner with tweezers and sprinkled gold glitter over that tape and rubbed it in. I repeated the process for the musical note on the flip side. The glitter is smooth like velvet. As I needed to send these in the mail, I sprayed the tabs with Krylon Workable Fixative, which did not affect the sparkle, but ensured the tape would not have any stickiness left.


I made eight of these cards, but only needed seven to swap out. So right now I am enjoying the bonus card for myself, but may send it off in the mail to encourage someone. I am entering this in the 613 Avenue Create Challenge for Anything Goes/Optional Twist: Distress It.


Saturday, April 22, 2017

Burnished Velvet Thank You Cards


I think my favourite thing to do with my Silhouette Cameo is to make "die cuts" in cardstock and back them with tape, then burnish micro fine glitter into the tape. This fills the holes with glittery goodness that is soft as velvet and does not rub off.

This glitter technique is called Burnished Velvet and in real life these cards have a lot of wow factor. For the first one, the tulips, I backed the cardstock flower with white cardstock covered in double-sided tape and rubbed in iridescent glitter to create a glittery background. I wish this showed up better in the photo. (All photos expand if you click on them.)


Stamp: Stamp-it Australia

The tulip design was a cut file from the Silhouette store, as is the peony below. Here is what it looked like in the store:
Here is what I made with it:
Stamp: Waltzingmouse Stamps

I tried to do a little shading with a few pink shades of glitter. I need to practice that more. Basically I masked off sections of the flower (I used the Cameo to cut the mask from the tape liner) and sprinkled on the darkest hue in the centre, rubbed it in, then added the lighter sections. 


I used a milkshake straw cut on a diagonal as a scoop to pick up the glitter and place it (mostly) where I want it. The technique is magical because the glitter looks a bit dusty until you burnish it with your finger. Then it comes to life and really sparkles.


It is Administrative Professionals Day on Wednesday so these two cards are going to the people in my office who really deserve much appreciation for all they do for all of us!

You can see more Burnished Velvet cards by clicking on that label on the right hand side of this blog. You can find out how to do the technique here: Be Creative tutorials.

Saturday, April 1, 2017

March Christmas Card


Where did March go? Here it is April 1st and I am just getting to posting my card for last month for Sylvia's Christmas Card Challenge. In my defense, I actually did this card at the beginning of the month but I had moved my photo studio cube to clear space on my dressmaking table and have only now gotten it back in place.

Sylvia's prompts for March were silver and ornament. I made three silver die cut ornaments for my card.
The background was created by sponging from my new Tim Holtz Distress Oxide ink pads. This was my first time using them and they are very soft and lovely. They blend easier than the regular Distress Inks. I like the contrast of the smooth chalk look and the silver foil on the die cuts.

The red ornament was made by laying the die cut on Sookwang Tape and sprinking with Glitter Ritz ultrafine glitter and burnishing in. The round ornament was placed over plain cardstock and I added colour with Copic markers. Here is a shot of the card on an angle so you can see the shine:

The sentiment is a Penny Black stamp from the Joy Filled clear stamp set. My local stamp store closed down this past week and this is one of the stamp sets I bought on discount. Very sad to see them close. I am sharing this over at Christmas Card Challenges as well. Thanks for visiting today.

Monday, December 26, 2016

Happy Hanukkah Card

Hanukkah began on the evening of December 24 this year. I decided to make my boss a Hanukkah card. He is always so gracious each year, wishing all the staff happy holidays and Merry Christmas and I have felt bad for not stepping out of my comfort zone to make a card for him. So I set out on a Google quest for inspiration and education. Who knew the number of candles on a menorah can vary?

I finally found a free SVG file (https://cutfiles.net/444/menorah-2-cut-file/) that I could cut on my Silhouette Cameo, and with selective masking, I was able to glitter up a burnished velvet menorah. I used yellow and gold glitters to create the flames. It is so pretty in real like, sparkling against the white cardstock. It seems blue and gold are traditional colours, but I think the menorah design is modern, clean and simple. Then again, what do I know? Happy Hanukkah!


I am entering this in the CAS-ual Fridays challenge:


Tuesday, December 30, 2014

Burnished Velvet Holly


Here's a card I made with my Silhouette Cameo and the Burnished Velvet technique. It makes for a great Clean and Simple design.


The sentiment is from Waltzingmouse Stamps. I cut the holly and berries with the Cameo, then backed the holes with a strip of tape and rubbed in green and red glitter. It sparkles in real life.

This is a 5 inch square card. I am entering this in two challenges: Christmas Card Challenge #4 - Anything Goes and the last Waltzingmouse Fanatics Challenge, Anything Waltzingmouse Goes.

Sunday, November 16, 2014

Flowers for WMS Fanatics Challenge


The Waltzingmouse Stamps Fanatics Challenge is Flowers. There's almost two weeks to play, and the theme is broad, so I hope folks will join in. They can even be Christmas blooms, like poinsettias or chrysanthemums.

I made this card to pop into the post for someone very special. I don't know if I am the only one, but it seems the more a card means to me, the hardest it is to get "just right!" I stamped and heat embossed flowers and leaves in clear on white cardstock, then went around the leaves with green Distress Inks and around the flowers with orange and yellow Distress Inks. Wiped the excess off to bring back the shine of the embossing.

The "miss you" is an electronic cut file that was cut out of the cardstock on my Silhouette Cameo. I cut a few, glued and stacked them together, then added black glitter to the final layer and nestled it back in the words-shaped hole. It is securely embedded, but also raised up a bit due to the layers and the glitter. Neat effect. I echoed the black with a very narrow border of black cardstock cut with my Perfect Layers tool and affixed to an olive card. And here it is upright:
Hope you'll play along, too! Thanks for stopping by.


Tuesday, October 14, 2014

Snowflake Bokeh, Baby!

The second Waltzingmouse Pajama Party Challenge is "Snow is Falling" and I had this concept, but my execution may not be ideal.
Wouldn't it be lovely if we could bottle up winter snow and send it south to those who have to gather around the light-strung cactus to sing Noel?

In the process of making this card, I had some challenges. The navy cardstock I chose was actually very porous and seemed to suck up the white pigment ink that is usually crisp and clear for me. Then I accidentally smudged some of the ink. What's a girl to do? I deliberately smudged more of the flakes and called it Bokeh!

A glitter pen, glitter marker, silver marker and finally glue and loose glitter were employed in an attempt to get some shine on this card. It is actually pretty in real life - but the camera does not pick up the shine.


Tuesday, July 1, 2014

Strictly Ballroom!


Hello, friends! Long time, no see. Work has kept me away from the craft room, but I am ba-a-a-ack! The theme for the Waltzingmouse Fanatics Challenge this week is Anything Goes, and the theme at the Cut It Up Challenge is Twilight, so I am sharing a birthday card made for my daughter's friend.

This gal and her husband are ballroom dancers so I had fun with the WMS art deco themed sets and my Silhouette Cameo machine. 

The dancers are made from a file from the Silhouette online store, as are the deco borders top and bottom. I pressure embossed the lady's white dress in my Cuttlebug machine. The train and underskirt are made with glittered cardstock. This is really nice quality stuff from my local stamp store - no shedding with handling. I used it to mat the stamped sentiment and the black embossed background.

I picture these two dancing at twilight, and the purple glitter also makes me think of twilight. 

It's fun to personalize cards for recipients. Take THAT, Hallmark! Why not join in the fun at these two challenge sites?


Friday, April 25, 2014

El's Peel-offs

Here is a fun card that uses some products from Elizabeth Craft Designs. My local stamp store (Stampers! in Victoria, BC) carries a lot of these things and often demonstrates how to use them. After a recent demo I was inspired to re-visit these techniques.


The black outline is a mylar sticker that I placed on double sided tape that was affixed to white card stock. Then I sprinkled clear glitter over and burnished into the adhesive. I then coloured in the image with (mostly) Distress Ink markers.

The pink iridescent reflective frame is a layer of pink iris Shimmer Sheetz, which is metallic mylar. I used a Cuttlebug Lacy Labels embossing folder to pressure emboss the design, then sanded the high points and fussy cut the outer edges. The inner oval area framed the glittery lady quite nicely. I mounted all on black glossy cardstock, then a layer of pink iris, and then a white card base. Decorative die cut corners on the black layer allowed more of the pink opal Shimmer Sheetz to peek through.
 
I am entering this in:
Crafting by designs - Use (a) flower(s) (Tulips in the corners)
 
It was a fun card to make using some tried and true techniques that I haven't played with for awhile. If any of this seems new to you, be sure to visit the Elizabeth Crafts website. There are lots of videos and great inspiration there and on their blog. Happy crafting!

Monday, January 20, 2014

A Little Love


Hello, welcome to my blog today. I recently watched a video by one of those talented stars in the stamping world - Jennifer McGuire. She showed how to get more out of your dies by paper piecing remnants from one die cut into another. I was inspired to give it a go. I used a Memory Box Cherish Border die and cut it out of a number of cardstocks and patterned papers, both white and pink. 

For this card, I inserted patterned papers and then highlighted them with Ranger Glossy Accents. I stamped the Waltzingmouse sentiment, For You, in the lower corner. Clean and simple.

The "love" stamp is an oldie, but goodie, from Stampin' Up! I used patterned paper for the border and glittered the insets.

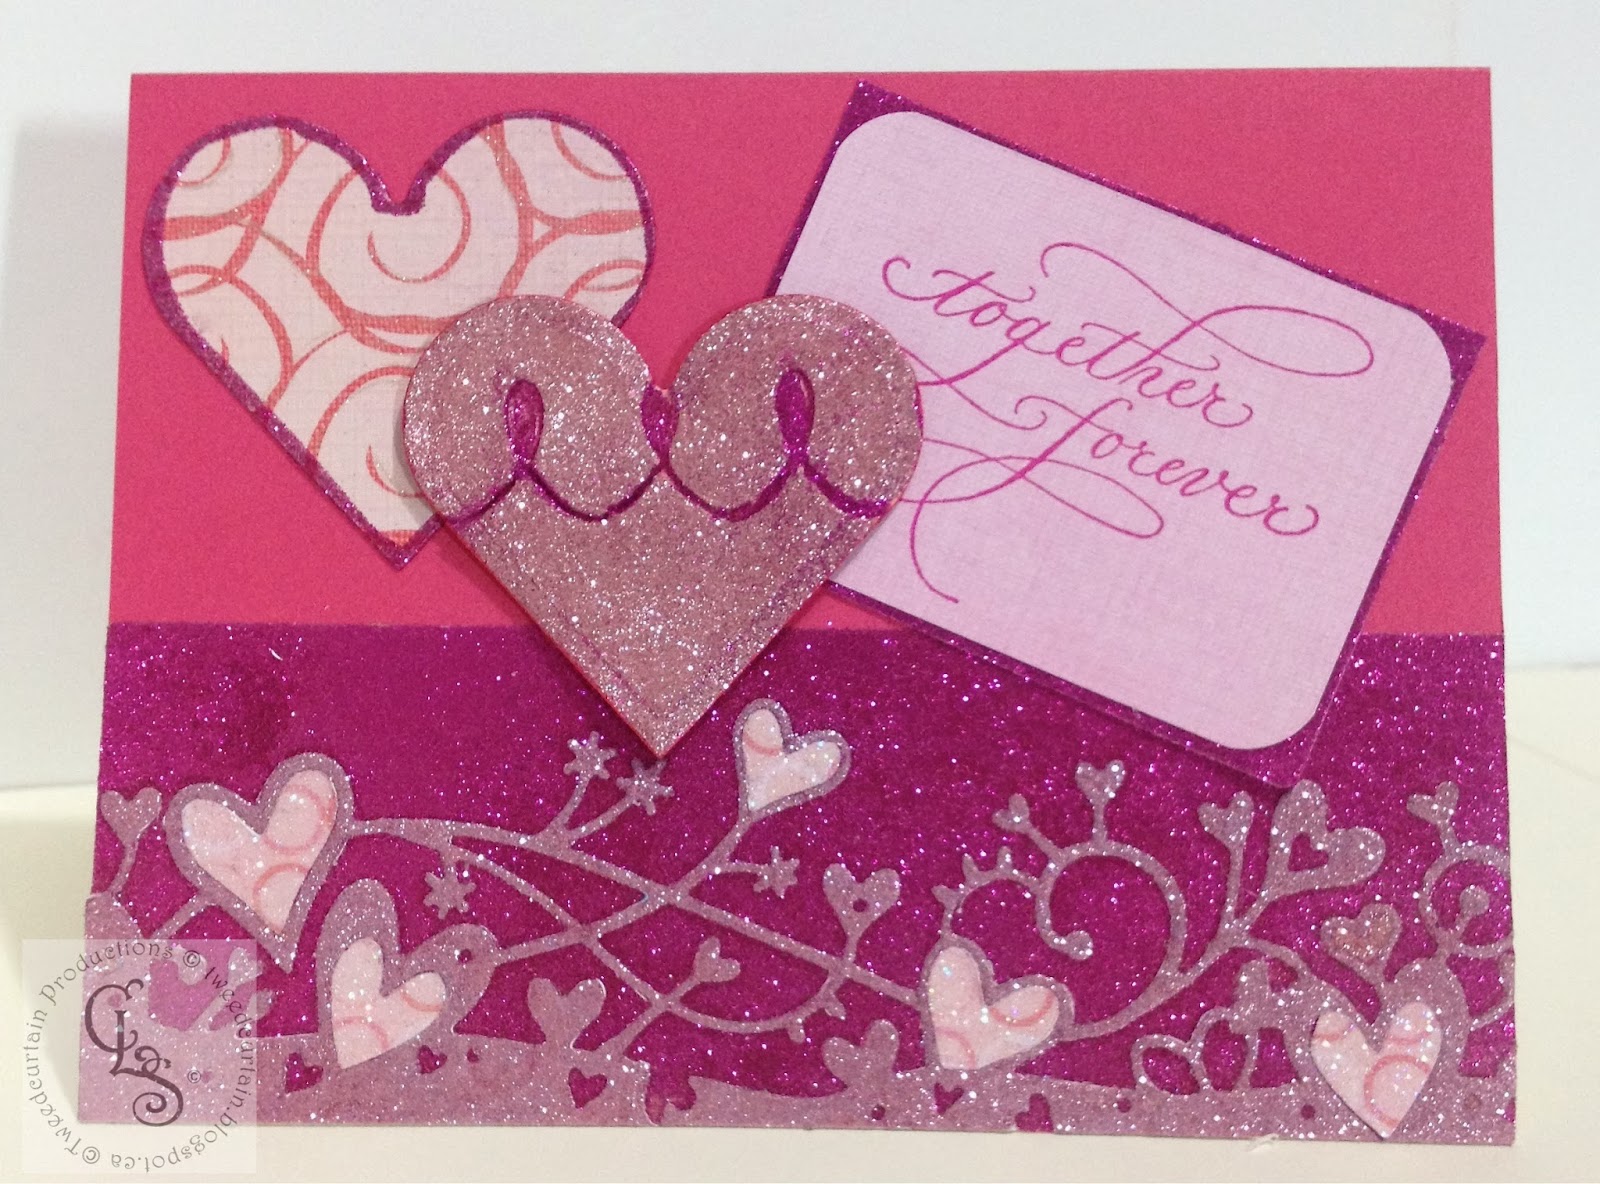
This last card is a riff on the Burnished Velvet technique. I die cut the border out of cardstock with double-sided Sookwang tape affixed to both front and back. This severely tested my Cuttlebug and I do not recommend it. It gave me the opportunity to easily glitter the border, and the background, and the insets. I then added a couple of hearts (Memory Box (modified) and Spellbinders) and the beautiful calligraphy stamp from Quietfire Design, stamped in StazOn Fucshia Pink. 

By the way, all these cards were made from Memory Box card bases. I get these from my local stamp store, Stampers!, and they are very good quality, with white insides and smooth as silk coloured outsides. Great weight - not flimsy. I like the saturated colours and the convenience of not having to cut and fold my own bases. Thanks for visiting today!


Thursday, December 5, 2013

A Belated Quietfire Thanksgiving

Hello, my poor, neglected blog readers! I hope if you are American that you had a lovely Thanksgiving. In Canada, we have our turkey in October. I sent a few autumnal cards off to my relatives and friends in the USA. For the ones I am sharing today, I used Quietfire Design stamps and cut files. This first card is made using the Burnished Velvet technique. The entire card front is covered in glitter and rubbed smooth (burnished) so it is smooth as velvet, but very glittery. The "Autumn" is a Quietfire cut file from the Silhouette store and the leaves are also from the online store. I applied wide Sookwang tape to the card front and ran it through the Silhouette Cameo to cut only the top layer of the tape's protective sheet.


Then I peeled back sections and sprinkled on the glitter to get the various colours. The top photo shows the glitter well.


This photo shows where I used a couple of different colours of glitter on the leaves. The true colour of this card lies somewhere between these two photos.

This second card is made using a Quietfire quote stamp and a companion pumpkin motif. I used Versafine Vintage Sepia ink and coloured with Copics.


On the inside of the card, I cut out the Quietfire pumpkin cut file in orange vellum and layered it over the stamped Happy Thanksgiving greeting.


I was in Phoenix just before the US Thanksgiving, and managed to get a manicure. I chose a coppery orange to keep with the season. The gal painted a flower on my ring finger. The manicure is long gone, just like Thanksgiving, but I hope you enjoyed this little catch up post!

Saturday, May 11, 2013

Christmas Card Challenge: Glitter!

May is my month to host the Waltzingmouse Stamps Christmas Card Challenge and I have chosen Glitter! for our theme.

My challenge is to use glitter in some form or fashion. I made a few samples to share in the WMS forum. This one is using glitter under acetate.
Stamps: WMS Vintage Ornaments; Paper: Memory Box
I stamped on one side in StazOn Iris ink and then used clear drying glue to apply glitter to the underside. Here's a close-up:


I am a new Silhouette Cameo owner (sooo excited!), and one of the things I have been eager to try is cutting out masks for the Burnished Velvet technique. For the card below, I used the free Bright Season cut files bundle from WMS to create the scroll frame and lantern.
I applied Sookwang double-sided tape to plain cardstock. The Cameo blade cut out the top layer of liner, but not the tape or the cardstock. I peeled away sections of liner and applied glitter one colour at a time. Below you can see where two colours have been applied so far.

The entire card front, except for the leaves, berries and banner, is one layer of glittered-up cardstock. It is smooth to the touch (hence the term "velvet"). It's mounted on metallic copper cardstock.

My last card features a cut file from the Silhouette Online Store for the card base. I thermal embossed the poinsettias and frame with Carbernet Twinkle Embossing Powder. The glitter is a little more subtle here. 

I hope you will join us at WMS to make a few more cards for your Christmas card stash. Details can be found by clicking on the logo at right.