Wednesday, August 28, 2013

Scrappy Strips


For the recent marathon of stamping at splitcoaststampers, we were challenged to create a card with strips of paper. I cut these strips from my much-loved October Afternoon Thrift Shop paper pad.  The image is an Oxford Impressions stamp.


Later we were asked to create a tag and I had some leftover strips so decided to use them on this birthday tag. The sentiment stamps are Waltzingmouse stamps. Ric rac seemed an appropriate trim.  Nice to get more mileage out of that paper!

Friday, August 23, 2013

Welcome To My Happy Place


What did I do on my summer vacation staycation? I decided to frugally improve my crafting room.

The biggest project was to beautify my clear plastic storage carts. My east and west walls in my basement (ahem) studio are lined with ten of these carts that have five or six clear drawers each. One set are Gracious Living brand and the other set are Sterilite, but they are almost identical. 

I am fairly organized, so I knew where all my supplies were, but it bothered me that I could see all the drawer contents. It was a little overwhelming that - everywhere I turned - my supplies were staring me in the face; perhaps even taunting me. I decided to line the fronts of the drawers with white cardstock and then affix labels to the drawers.
 Lined and labeled drawers.
I really wish I had taken "before" photos but most crafters can picture the jumbled interiors of these types of storage units. Trust me when I say this is a radical improvement to the feel of the space.


Labels created on my Silhouette Cameo.

I created over 50 fancy black labels on my Cameo cutting machine using a file from the Silhouette Online Store, then created labels in MS Word and printed them in black on white cardstock. I used repositionable tape to affix the titles on the backgrounds (so if I change contents, it is easy enough to move the titles around), and used Thermoweb Permanent Sticky Dots to affix the black fancy labels to the plastic drawers. This is my "go to" adhesive for intricate die cuts. 
Thermoweb die cut transfer adhesive.
Labels on Thermoweb sheet ready to be rubbed to
transfer glue dots to underside.
East wall.
My long work table is in the middle of this space, with room to walk all around it. I face the east wall (above). This bank of drawers contains less-used items.

West wall. I sewed a quick curtain in B&W to match the new scheme.
I removed the castors from all of the carts. Then I went to Home Depot and had two long bookshelves cut to length to lay across the tops of the carts. This evens out the top surfaces and prevents anything from falling down the thin space between the units. On the west wall I have my Cuttlebug die cutter, Genesis trimmer and my Scor-pal. All of my rubber stamps, ink pads and papers are on this side of the room, which is the side I sit on.

Lots more photos follow, if you want to see more, but the part I am thrilled about is the restful white drawer fronts and the way they visually made the space calmer, larger - and hopefully more creative! In hopes of that inspiration, I am sharing this on the Inspire Me Fridays 117 - Anything Goes blog.

Cuttlebug (left) with plates and shims directly above,
and Genesis trimmer (right).
The bookshelf board provides great stability for my trimmer.
Custom built stamp pad holder above the Scor-Pal.
I had two of these 100-plus year old printer trays against the west wall, but downsized my small stamp collection, leaving just this one in place.
Next to the Scor-Pal is my 8.5X11 paper sorter.

 Xyron, punches, sentiment stamps and ribbon.

Smaller Iris cart received smaller labels.
Small set of drawers got similar treatment.
I slapped labels on these but will re-do when I am not so tired!

One of two bookshelves against south wall.
Rolling mechanic's tool chest in front is where my
Cameo will go. 
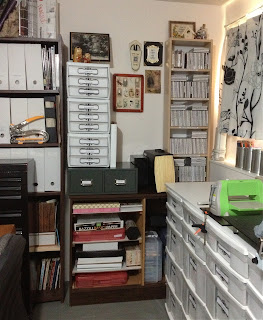
Rubber stamps, dies in metal file drawers, and
12X12 papers. IKEA tower holds unmounted
stamps in CD cases.

I emptied three bookshelves (not shown) of 16 of these magazine holders. They held quilting and cross stitch magazines up to 30 years old! Some thrift store shopper / quilter is going to be ecstatic!

All Tomorrows...


This card is a favourite of mine from the Splitcoaststampers marathon. It came together very organically with little forethought - just grabbing what was at hand and going with it.

The background is complex. It started out with some Tim Holtz kraft resist papers. I added some Distress Stains and stamped a Stampington collage cube damask pattern on top with archival ink. The Stampin' Up! sunflower is stamped with dye inks and cut out and popped on top. The sentiment is an Oxford Impressions stamp.

Thursday, August 22, 2013

Thank You Chalkboard Style

This is another Splitcoaststampers challenge card. This Quietfire Design sentiment looks like chalk when inked in white pigment ink on black cardstock. The flowers (Autumn Leaves) were stamped in white and embossed on red cardstock. I accented them with a few pearls. I like the black and white diagonal stripes. 

Wednesday, August 21, 2013

Sprayed Stencil Backgrounds

Stamps: Stampers Anonymous

This is another one of the 42 cards I made in the recent Splitcoaststampers DTGD challenge marathon. It was pretty easy - spritzed some Tsukineko Walnut Ink sprays across a Crafters Workshop stencil, then overstamped the bird on the branch and the quote in Black archival ink. I blended some Broken China distress ink into the swirls.

Here's a card using the same technique with a homemade spray mist I created from a Broken China Distress reinker. Very different feel to this one.

Tuesday, August 20, 2013

Birthday Blessings

Stamp: Waltzingmouse

This was a fun card to make. It was a sketch challenge over at Splitcoaststampers and the only stamping on it is the word Blessings. The main graphic, the vintage floral spray, is a "print and cut" file from Echo Park via the Silhouette Online Store that I print and then cut out with my Silhouette Cameo machine. The bow is a Li'l Inker die. Papers are from the Bubblegum Hills pad.

I am entering this in the Seize the Birthday Challenge as they have moved to an "Anything Goes" format now.


Monday, August 19, 2013

Dreamweavers Stencil Ornament


The Dream It Up Blog is having a Christmas in August challenge. This is a flat porcelain ornament. I covered it in alcohol inks using the Polished Stone technique. Then I taped the antler snowflake Dreamweavers stencil in place and sponged liquid adhesive on the surface. I let it sit for 30 minutes to get tacky, then applied silver leaf. Finished the edge with a silver paint pen and tied on some metallic ribbon floss. It was difficult to capture a good photo that shows the shine of the leaf and the glow of the inks!


A Star for Christmas


My Christmas Card Stash is coming along nicely. For July, the Waltzingmouse Christmas Card Challenge in their forum was to use a star on your card. The current Festive Friday Challenge is to make a card for a child. What child would not want this card direct from St. Nick himself? I am also entering this in the Weekly Christmas Card Challenge.


Friday, August 16, 2013

Monday, August 12, 2013

Summer Colours for Christmas

Stamps: Waltzingmouse
Still working on the Christmas card stash. This one is for the August Waltzingmouse Christmas Card Challenge from Deborah Frings to use Raspberry, Tangerine and Lime. I used Distress Inks smooshed on white glossy cardstock, heat set, then overstamped the ornaments with StazOn ink. Added glitter with a glue pen.

Prima Masks!

I recently participated in the Splitcoaststampers annual Dare to Get Dirty event. It is referred to as the Iron Man marathon of stamping. They issue 42 different card challenges during the week, I think six per day. Each was a different technique, or a sketch, or some other required element. I made all of them - just barely - with 36 of my cards completed in the last two days once my vacation started. This was one of the things I wanted to do with my "staycation" this year.

These two cards were part of the results. I used a Prima mask (plastic stencil) over patterned scrapbook paper (same paper for each card).

Stamps: Inkadinkado Nostalgia. 

For the butterfly card above I used Tsukineko Walnut Ink sprays over one of the Prima masks from this set:


Die: Sizzix Caged Bird

For the bird card I used sprays and sponged on Distress Inks. This was leftover stencilled paper or "test" paper, but with my faux verdigris birdcage I thought it would work well. The amazing quote (close up below) is a Quietfire Design stamp.

The challenge was an incredible experience. Normally I hum and hah over a card and can take an hour or two to make one. Time did not allow that, but I was determined to try and make my normal quality level of cards instead of just slapping any old thing together. Toward the finish line that was severely tested but I think I remained true to my goal! I'll share more cards from this event soon. Thanks for visiting.


Thursday, August 8, 2013

Festive Friday Card


I have been wanting to play along with the Festive Friday gals forever, but just no time. Luckily I am on vacation now and going nowhere, so I was able to play this week. The current theme is to use the element: Candy Cane. Here's my card: 


My candy canes are sitting in an acetate jar. Clever stamper Deborah Frings does a great job with the technique of stamping glass jars on acetate, then leaves little tabs when cutting out the image so that the tabs can be inserted in discreet slits in the card. This eliminates the need for adhesive and frees up the inside of the container to "hold" things! So thanks to Deborah for that technique, which I have been meaning to try. I used it for my jar and my lid. Stamps are all Waltzingmouse; sentiment is a rub-on.

I also created this card for a Splitcoaststampers DTGD Challenge for red and white, the A Simple Five Inspire Me Fridays Anything Goes Challenge, and Card a Day's August Challenge to use a die cut. Thanks for looking!


Tuesday, August 6, 2013

Cheerful Stamp Pad Challenge - Vintage Children


Here is a card I made for a Splitcoaststampers DTGD challenge that also works for The Cheerful Stamp Pad's challenge to use vintage children. This poor little gal does not look happy - perhaps posing for the camera too long? Dusted off the sewing machine to add some stitching.


34 Years... but who's counting?


My husband and I just celebrated our 34th wedding anniversary. We exchanged homemade cards. I will save his stunning creation for last, but may I say it is a testament to his sense of humour - and mine!

I chose something more romantic - using these lovely Quietfire Design rose and sentiment stamps. I gold embossed them and watercoloured with Distress Markers. The rose is bordered by an Opera Tag die cut from Waltzingmouse Stamps.


The background is created using the "Belleek Pottery" technique, which is a form of letterpress. I used Marvy Matchables Peach dye ink.

Now here is my dear husband's card, complete with his own hand lettering:
He has lately been watching the old TV series The Munsters, so that was the inspiration. He had a mushy poem inside that he said he borrowed only the first two lines from the internet to create. Who says romance is dead?